Wednesday, December 31, 2008

2009 Victorian Track Sprint Schedule

Here is the schedule this year. It will be continue updated until the end of 2009 and highlight my potential starters and DNS.

19/01/09 - MCA - Phillip Island Practice
26/01/09 - CC (NSW) - Wakefield Park
01/02/09 - MX5 Club Vic - Winton (form)
14/02/09 - WRX - Haunted Hills Hillclimb
14/02/09 - Driver Dynamics Sandown
15/02/09 - PIARC - Phillip Island Sprint
15/02/09 - MCA - Haunted Hills Hillclimb
01/03/09 - AROCA - Winton Sprint (short track)
08/03/09 - HSCCV/FFCC - Haunted Hills Hillclimb
12/03/09 - Events O'Neill Sandown
|22/3/09 - RENEW Wakefield (form)
28/03/09 - Driver Dynamics Sandown
04/04/09 - WRX - Phillip Island Sprints
19/04/09 - MCA - Sandown GP
23/04/09 - Events O'Neill Sandown
25/04/09 - WRX - Sandown Sprints
27/04/09 - CC (NSW) - Wakefield Park
02/05/09 - Driver Dynamics Sandown 
10/05/09 - HSCCV/FFCC - Sandown Sprint
28/05/09 - Events O'Neill Sandown
31/05/09 - AROCA - Sandown Sprint
31/05/09 - PIARC - Phillip Island Sprint
06/06/09 - Driver Dynamics Sandown
13/06/09 - CC (NSW) - Wakefield Park
21/06/09 - MCA - Winton Sprints
25/06/09 - Event O'Neill Sandown
28/06/09 - WRX - Sandown Sprint
04/07/09 - AROCA - Phillip Island Sprint
04/07/09 - Driver Dynamics Sandown
12/07/09 - HSCCV/FFCC - Sandown Sprint
18/07/09 - WRX - Winton Sprint
25/07/09 - CC (NSW) - Wakefield Park
26/07/09 - NCCA - Sandown John Mott Sprint

08/08/09 - OzRenesis/RX-8 Club RX-8 Nationals Wakefield

09/08/09 - AROCA - Winton Sprint and Regularity (long track)
16/08/09 - PIARC - Phillip Island Sprint
16/08/09 - MCA - Sandown Trident Day
05/09/09 - CC (NSW) - Wakefield Park
??/09/09 - AROCA - Sandown Sprint (tba)
27/09/09 - HSCCV/FFCC - Haunted Hills Hillclimb
05/10/09 - CC (NSW) - Wakefield Park
10/10/09 - WRX - Winton Sprints
17/10/09 - AROCA - Winton AROCA 6 hr Relay
18/10/09 - AROCA - Winton AROCA 6 hr Relay
25/10/09 - MCA - Sandown Annual
03/11/09 - HSCCV/FFCC - Sandown Cup Day Sprint
15/11/09 - PIARC - Phillip Island Sprint
28/11/09 - CC (NSW) - Oran Park GP
13/12/09 - AROCA - Phillip Island Sprint
19/12/09 - CC (NSW) - Wakefield Park CC Festival
20/12/09 - CC (NSW) - Wakefield Park CC Festival

Wednesday, December 17, 2008

A wet Winton track day = hard work, but I have got POWER!

This should be the last track day of the year and proven to be interesting. The unusual severe rain cloud gathered over Benalla and provide an interesting experience on a race track that has the reputation of the lack of grip.


Today I was going through the data, comparing the run from Tampermotorsport days which is a dry track to this time in a wet track. Seriously, look at the acceleration of my car. Left graph is the little straight coming from turn 10, and the speed is 10 kph slower coming out of it and seriously, I am sure the throttle will be slower to get in on a very wet track, but still speed before I braked in the wet is only 2kph differnet from dry. Same goes to the main back straight. 13 kph to start and by the end of straight, 2.3 kph only!!!

The sleep of the acceleration increase so much. The only mod you can see is change of spark plug and my butt dyno told me the power is back. It is back!

Saturday, December 06, 2008

Rear endlink, lower arm bushings, and battery relocations.

I at least check my car 4 times a year at my mechanics. So change of from spring to summer, it is time to do another check. I only did 2000km since last change and 3 short cool spring track days since last oil change. I don't see the difference in terms of colour from the dip stick. So it is topped up to full mark and left for another day. Will change after new year or before the next track day.

 
I eventually get the rear Autoexe endlink installed. This is much adjustable but the require length is much shorter than stock. Stock is very high for the height of the car. I also get the member metal washer installed.

Then the major job to relocate the battery from the front or in front of steering axle to on top and slightly rearward to the axle. And the battery used now, although is much weaker in terms of crank amps (380 vs 750 CCA), is much lighter (7.8kg vs 17kg).

The empty space left after the battery case is removed is interesting. The idea is also to increase airflow though the engine bay. You can see the left side of space created shows the silver bracket of the Defi coolant sensor (that bracket is made from Fujita eng). So it is near radiator and hopefully air will partly go through there. I was told about this from a friend in Japan (thx Tom).

This kit is made by RE Amemiya, Please read my previous post about this. We found out the problem when we cannot match all.... the instructions in the installation menu. Firstly the stock washer is different shape in Australia, thanks to the stupid rule that all the HID lights sold has to have a washer. I wonder this is still current. Anyway we have to remove this motor and the washer tank, with the sensor attached. Lucky the low washer level light did not lid on the dash after removal of it. Otherwise it will drive me mad.

But the wiring of my RX-8 at the battery (+) point is different from the installation menu. Particularly, there is a big big big positive from the radiator side that seems to be missing in the Japanese models. Well we cannot risk a major error since you see that square box is the EPS (electronic power steering) fuse. Loosing power steering is not fun on the road at speed or no no on the track. No power steering is very heavy, you cannot even steer to get out of a car spot. (Addition: Now we have put all the cable back together like stock mode. Instead of the RE Amemiya's suggestion to bring the EPS unit by an extension cord to the new battery location. We feel that the extra wires and stuff deserves a proper connection so we just get a long connecter to connect from the stock location to the new location. Hope that will last long)

  This is the bonus oil catch can. The supplied tube runs from the top of oil inlet to the can before going to the MAF tube.


  The washer is now this tinny wee can size haha. The original motor can be used on the side (not shown in the picture). The odyssey battery sits very prettily in the bracket.

I also change the spark plugs. The old plugs are covered with carbon deposits after a year of track days plus very limited daily drive. But it is not fouled at all. However, even the difference from this good looking covered plugs to clean ones are amazing. I think I will clean those plug quite frequently now. I have asked Nelson to clean the plugs and save them for about autumn/winter time. We have also tested the spark plug cords/leads (after 2 years changing to the Fujita ones). They are ok. Resistance is about 380mOhm on leading, which is longer than the trailing ones at about 270mOhms. We decided if any one is under 200, we will change the whole set before burning the current set of coils.

It is now set for next Saturday's Winton day. Forecast is some rain/shower 3 days leading to Saturday's track day. The chance is low but we will see. Finger crossed .

Friday, November 07, 2008

RaceChrono2AVI rivals the legendary TrackVision

This is the new beta version 0.3.27.

The updates include:
- Speed Smoothing
- new interface for customization of digital display and gauges.
- Digital displays can change foreground and background colors and can been bring to front.
- Program window got top caption again and can be moved by clicking only on the caption
- A new digital display for the "best lap so far", it will show the best lap only when it will reach and will blink for 10 seconds.
- Track gauge will not clear any more the original background before drawing the gps track, look at the Winton track gauge for an example.
- Avoiding absolute path in cfg files.
- "ON AIR" icon shown when avi recording is active.

This beta version alone is already better than TrackVision. Comparing RaceChrono2AVI to TrackVision:

1. RaceChrono2AVI is free. TrackVision costs $200 to buy, and they have to authorise the payment as per server so there won't be cracks or even potential sign in/installation problems.

2. RaceChrono2AVI's gauges can be arranged by drag and drop the gauges to the place you want. TrackVision can be customised only by doing the codes.

3. RaceChrono2AVI renders a movie of the data in any format you choose. Then you use that video to overlay your track in car camera's video. You need a video editor such as Sony Vegas or similar to do that. It is an extra program but who has DV video does not have a video editing software, and you can do DV widescreen for your video. TrackVision includes a video render program that does not allow to insert other video (so you still need a video editor to make a story or a track blog) and rendering video is in 4:3 aspect ratio only.

4. RaceChrono2AVI is easier to make your own dash. I try to do that in TrackVision. Although the code (language) use to generate the dials are similar, it is still pretty hard to adjust the exact position and also the calibration of rpm gauge and speedometer (refer again to point 2).

The followings are the screen shots of my 2 custom dashes (the cfg files can be download here). Unzip and install the files to the RaceChrono2AVI/cfg/ folder


The result is this:


Also the RaceChrono program can be used to measure a course. So you want to show how fast you move from Point A to Point B. A touge run hehe!

Thursday, October 30, 2008

RaceChrono's data video maker (RaceChrono2AVI) takes shape

This is more interesting news for the RaceChrono fan and video maker likewise. This program (RaceChrono2AVI) has taken shape and promise to rival the top race data video premier (TrackVision). It is true that TrackVision have video rendering function for the average Joe for video editing. But most people into digital video will have the software (in my case Sony Vegas Movie Studio Platinum 9) to edit the picture. Most video editing software allows picture in picture function, and the rendering flexibility and quality is professional, and far more superior than TrackVision. You can make a video track blog like mine below with race data for instance. Very useful indeed. More in the RaceChrono2AVI forum.

The latest beta utilise data export from RaceChrono beta v1.02.

Here is the final product. Most of the thing can be changed. The background (the RX-8 dash), the rpm gauge, the speedometer configuration, all the lap times and gauges there, track map etc have choices and all are drag and drop. Finally the movie is made by video capturing in real time, so no more touching the screen and let it run.

Picture in picture the video data, result in this!

Latest beta can be download HERE (beta v0.3.22).

Wednesday, October 29, 2008

Beat the falling dollar - a few goodies (parts)

I got these new Japan made OEM Mazda mats with nice emblem on them. My original one is worn badly, at the same area in the the square of this new one. So this one has a more rough and touch fabric inside the square to combat this problem. I intend to use it though for stability, when I have the interior stripped out I will use this mat so that I won't slip in the car haha.


Another box of goodies came the other day. I order this a while ago when the Yen is still 88 to a dollar. So these only cost $800AUD. Now they are over $1000AUD. I got the above rear Autoexe endlink to match the front. Also I have a replacement set of the spark plugs that I have now. As you recall from the last video that I have problem getting up the hill. If the plug are full of carbon and cannot be cleaned, I have a new set to replace them.

  These are rear member joints. They are aimed to stabilize the rear, giving more control. Less flex will surely give me more confident to power out quicker.

Should have order more, only if I knew the dollar is so low now. smile_sad .

I also ordered a battery relocation kit from RE Amemiya. I got to install them and do more picture then. But these are the current pictures.

These are the water washer tank... I think I need this. At least to use to direct the water to the intercooler or radiator LOL.

Oil catch can, with a let off pipe for drainage. The tube besides it show how much oil there is. I don't think they will be reusable. LOL.

Battery stay for relocation. It is smaller than OEM battery so I will have to get a slimline battery. Odyssey is top choice so far, since D-technique is using it.

Sunday, October 26, 2008

Sandown Night Sessions

This is my first night session @ Sandown and hell do I love it. My aim this track day is to work on the sector 4 and 5 of the course.


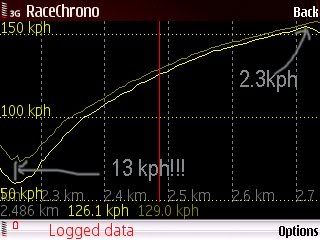
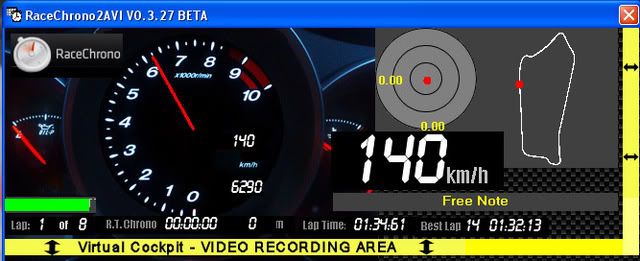
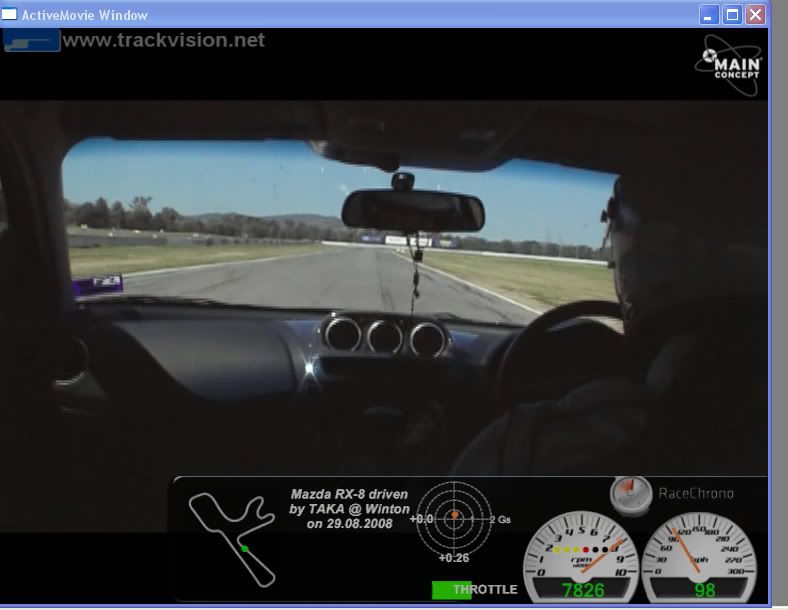
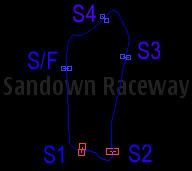
As you can see the 4th sector (between S3-S4) is the downhill left sweeper towards the Dandenong corner and the final sector is the S bend before the front straight. I have been missing on those areas to improve my times. As my car is not the lightest and not the most powerful, anything that I can milk out of the corners will give me bonus and hopefully later able to hit into the low 31s. I did just that. I gain about 3 10th on the final sector. The 4th sector is nearly equal on time but with the wind I was not able to put some top speed on the car.

I also need to look at the spark plug since it is about closing on the 10000km mark. But I think the power is fine on the front straight and the whole lost of speed is a combination of head wind and lack of power out at Turn 4.


Enjoy the video blog that I just made. If you don't like to be called Vinny (I can change that smile_regular
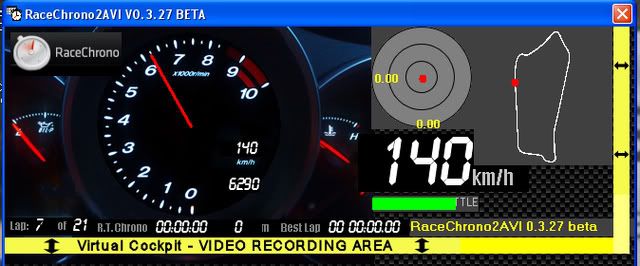
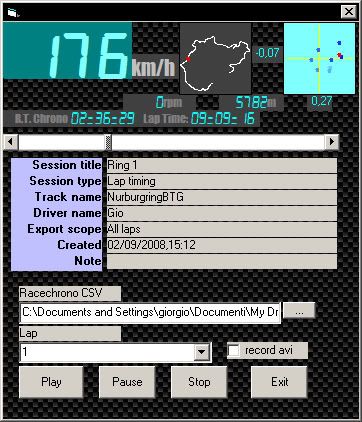
). He probably will not see that anyway. There is a lot of improvement in the video software (RaceChrono2AVI since then).

Tuesday, October 07, 2008

RaceChrono2AVI program - TrackVision for free

If you have played RaceChrono enough, you will love this program. This is the TrackVision for the RaceChrono, and for developer to call it RaceChrono2AVI (download HERE). This program uses the .csv files export from RaceChrono and use it to generate a moving AVI file. All you have to do is to use a movie maker to combine a picture in picture video. I use Sony Vegas Platinum 7.


A few bugs at this stage:

1) I cannot use single lap files. All lap files are used at this stage.
2) The capture does not work in all Windows Themes. I use the Classic theme to reduce the top of the bar and it works perfectly.

*******both the above has been solved and a new beta V0.1.15 has come out (8/10/2008)*********

The end result:

Thursday, October 02, 2008

TrackVision demo review

I have eventually downloaded the demo version of the TrackVision and now RaceChrono (beta v1.01 or better) can be used to render and integrate the data into the video file. The demo version allows you to view the files in action but the video cannot be exported or saved. At the moment (RaceChrono beta v1.02), the data that can be used in TrackVision includes speed, rpm, map and position, throttle position, and G meters. This is a screen shot of that. The dashboard is custom made and I have emailed to Antti at RaceChrono for review.

It does give immense versatility to set it up probably, but that means it can only work with one particular model of cars, since there are so many variable to set up. This is the screenshot of the demo, and it is poor quality. The real thing is also subpar as the rendering program is not up to professional standard.

   A forum member, on the other hand, offers to write another program which render an avi format video from the data. The only thing you have to do is to PIP the clip in the main clip. Just like the best motoring mode. Sweet if it is free!

Wednesday, October 01, 2008

My Q-steer RX-8

It is small and fun, and I can make a F1 course for that and set some record haha. The other is a phone strap.

In action:

Video Blog: TMS Winton Track day


This is the video track blog for my track day last Sunday at Winton, organised by Tampered MotorSports. There are so many cars that it is unbelievable. There are 6 groups that means plenty of time and so little track time.I only did 26 laps or so for the whole day. Also they have 20 minutes sessions that most car could not lap continuously due to tyre and brake restrains.

I did a good opening session. When the track temp is going up through out the day, the time falls for everyone. I had my best lap of the day heading in the low 42 before a mistake of overbraking.

Thursday, September 25, 2008

Clean airway

I took out the filter element to my horror I saw some oil in the engine face of the filter. Ok the poor baby chuck some oil. It is time to investigate how it happens.

I drove to Nelson @ Racing Project and ask him to take the air box, MAF tubing and look at the throttle body. The throttle body is clean and does not seems to have oil coming from the engine. Why does it have it in the MAF tube then??

Ah there is a tube that coming from the tube where I put the oil connecting to the MAF tube. I don't why it is there but I am sure it is there for a reason so I left it there. The opening is so high up that I think when I put oil in straight (without a funnel) that I must have got some oil into the tube. That is also why the oil in the tube and filter look so fresh.

Ok, I must now be careful when I put engine oil in and also use a funnel (stop being lazy).

I also change the filter back to the R Magic pipercross. The car felt different but I am sure it is to the better or worse.

Friday, September 19, 2008

Suspension once sort out; future major power mod

Suspension

I went to an expert today. Centreline suspension is one of the oldest in the business. When I said "old", I DO mean "old". A non-computerised, technical, old-fashion, stone-aged, down to earth, suspension centre. They have racing experience from the ice age and hold a barest of the mechanical equipment. Even doing alignment is manual. By manual I mean have 2 lines parallel to the car and measure using a ruler. smile_omg
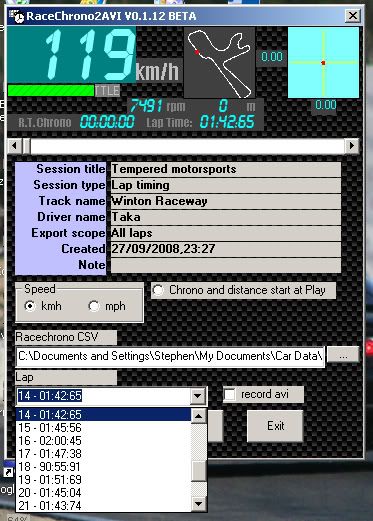
. I dreaded that I did not see how they did the camber.

I was waiting them to take out the scale for corner balancing. To my horror they did not bring out a balance scale with their pet elephant at the other end. It is an electronic gadget!

These are what they "measured" and aligned.

Front Toe 3mm total. Camber -2 1/4 degree. Caster 6 degree.
Rear Toe 1mm in both side Camber -2 1/4 degree.

Corner weight (with a fat me in it smile_embaressed
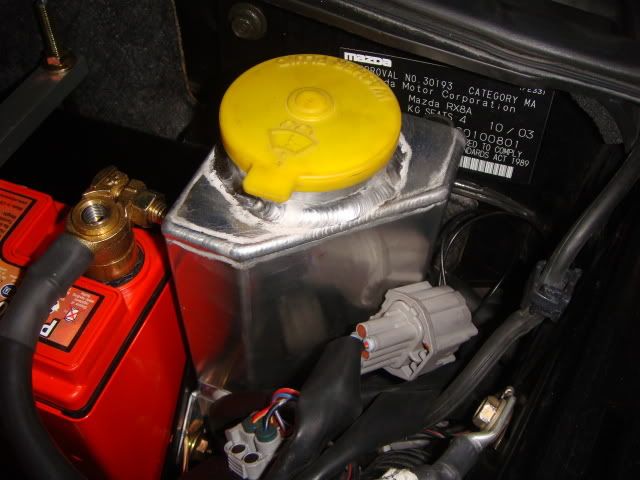
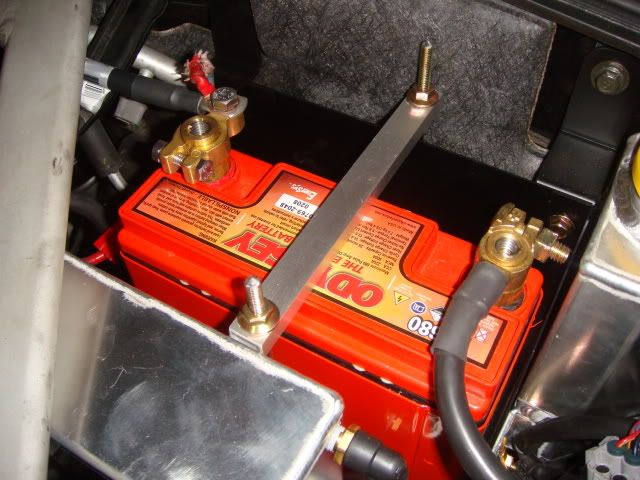
). Actually not much being done. Since the last time was done about 6 months ago. It is pretty good even I have the front battery change, bucket seat installed (that is about 15kg difference)... I must be gained that much weight???? But actually the car is 7kg lighter than last time. I think even I lost 20kg, because I am sitting pretty much between the car, the cross weight will still be balanced. No point to redo it again for a long time.

FL 360kg    FR 387kg

RL 321kg    FR 355kg   cross weight 50.2%

Total weight with TAKA 1423kg (Full fuel tank)

Also I had them to look at the ride height. They said the A arm is pretty much flat to slightly tilted upward, so if any lower (like last time I was at Philip Island). is too undesirable. So I make some relief.

I don't know what they did. The biggest change is the caster. I think it is driving very well. Must be confident now for next Sunday at Winton

Power end

I went to see Simon @ Promaz with the full knowledge that I will get sucked in and probably end up spending a lot of money to get his stuff. Yes he told me that if I want the car being a race car and not require EPA certificate. He will do it up with electric water pump, methanol injector, engine rebuild, balanced and improve seal, larger turbo, bigger boost, straight exhaust and .... wait for it 300+ kW AT THE WHEEL! He is doing just that to his drag car, but he will detune it for a track racer. OH MY!

800hp bearing tubro.... I just need to find the clutch and LSD that can withstand that . Kaaz has the one for RX-7 as well as the 8 so I at least find one.

Thursday, September 11, 2008

Water pump exchanged

I have installed the MazMart REmedy Waterpump. It looks like the stock housing with a new blade on them. They claim that this pump will have twice the flow at 8000rpm. Certainly nice to avoid cavitation on track. The one on the left is the stock one and the one on the right is the MazMart water pump. Nice


When Nelson took stock one out, and had a look at the side and found the stock pump is leaking very so slightly. So I guess it is a good decision to change it in the first place.

I also ask Nelson to change the brake fluid (Motul 600RBF), LSD oil (Redline 80W140 aka smelly shit) and the gear oil (Redline lightweight shockproof). Nelson has used my empty fire extinguisher to put them in... what a recycling expert!

Saturday, September 06, 2008

I made my old iBlue 737 1Hz GPS to run at 5Hz

This is a method that is well described here.

I am here to explain in very layman's language of how to do it and why we do it.

The old GPS is a bluetooth device and operate at 1Hz. That means a set of co-ordinates are updated 1 time per second. That is very much enough for daily traffic and GPS navigation. However, for motorsports application, it is more advantages to get more data. This unit is also sold with the 5Hz function, which is set at factory.

Someone found out that you can change the update rate on those units by sending a command via computer to the unit. The 1Hz device does not have a link/bridge/wire so that computer can control the update rate. To do that, one must create a link/bridge/wire on existing in the 1Hz device. The link we can use a resistor. Here is how to do it.

Tool required:

  • 1 x 0.5W 1K Ohm resistor (a pack of 8 can be purchased from JayCar for $0.32),
  • Small spectacle screw drivers (the blade small enough to fit the groove of the unit.


You have to open the unit, to do so you find a sharp screwdriver (such as one to fix spectacles), insert biggest one that can fit the tiny grove at the back of the unit (see the picture below), twists, and open it slowly. This is to loosen the clips at the back and on both sides. The front has no clips so just open and pull backwards. Make sure the on/off switch does not drop on the floor.

Once you get it open. Have a closer look at the board and use the two picture below to orientate yourself. Then use one of the resistor to align the two holes together. By linking this 2 holes you can write commands on the GPS. I don't know why the author in the above link asked us to solder the resistor in. But I found that the wire is slug fit the hole and it is pretty secure. If you have enough wires through the hole as shown in the picture, I cannot see how the resistor will come undone. Even if it is undone, you just need to put it back in next time to send another command. Big deal. If I solder it, I am sure I will cross at the wire near all those closely located holes. Coz I am very messy.

Click on the photo and see the wiring clearly.


To change the rate. First you have to acquire a program to do so. One such program can be download free from Qstarz download centre. It is a rar file (another type of zip file), so you need a WinRAR to unzip (or un-rar) it.

It is a .exe program and when you open it. You will see this. Pair your bluetooth with your computer first, and take note on the COM number of the connection (or right click on the connection and choose properties menu, I am sure it will be listed somewhere). The bluetooth on mine is COM 41 and I set 115200 as the Baul rate (whatever it means). If you don't have a bluetooth in your computer, you need to buy one. I have not make it work via USB at all.

Ok once it is connected, you will see a set of numbers flash across the big text box below the On button and the SNR box will show you the satellate tracking status.

If it flash roughly once a second, you are at 1 Hz. If it goes crazy, it is pretty much at 5Hz. LOL.

Now click the "setup" tab, you see the fix update rate there. Choose 5. Click Set!


If the resistor made correctly, SEND OK banner will turn up. Go back to status, it will update crazy! WALAHH!


WHY DO YOU DO THIS WHEN 5Hz unit exists:

  1. Perheps you have a 1Hz device now and see if you can change it to 5Hz.
  2. The iBlue 737 is $69 + postage at eBay and 747 is $79. Qstarz Q818 extreme is $99 + postage.

KIND ADVICE: If you have a flat battery, you will go back to 1 Hz, so keep the battery charged or check it periodically if  it is still operating at 5Hz.

WARNING: See below

DISCLAIMER: Edit your hardware at your own risk, don't blame me if you blow up your house and caught on fire. I will not bear any responsibility on the above I have written. It is like believe me or not!


Blogger Templates by Isnaini Dot Com. Modified by step-hen.com. Powered by Blogger